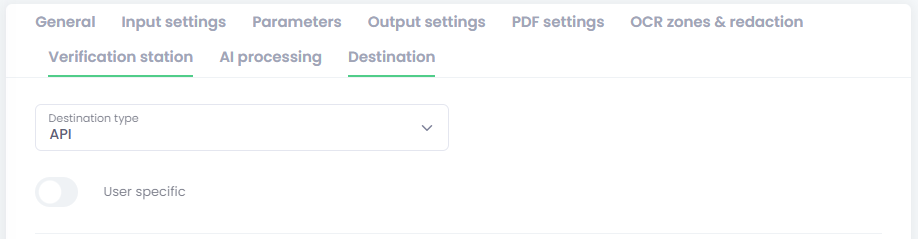
API destination lets a workflow send scanned files to any HTTP or HTTPS endpoint.
It is designed for integrations where the target system expects:
-
a direct file upload,
-
a file upload together with additional fields or headers,
-
one or more API calls before or after the upload,
-
OAuth 2.0 or Basic authentication,
-
user-specific values or user-specific credentials.
Unlike Dropbox, Google Drive, and similar destinations, user-specific API authorization is handled per workflow. In the Workplace, users see a separate item for each API workflow that requires private user data or private user authentication.
Typical Use Cases
Use API Delivery when you need one of these patterns:
-
Upload a file to a custom DMS, ERP, CRM, or ticketing API.
-
Send the file together with metadata fields such as document type, customer number, or job ID.
-
Call one API to create a record, parse the returned ID, then use that ID in the upload call.
-
Upload the file first and then call another API to confirm or finalize the transaction.
-
Use one shared service account for all users.
-
Use a separate OAuth token, Basic credentials, or business identifier for each user.
How API Delivery Works
API Delivery executes a sequence of HTTP requests for each delivered file.
The important rules are:
-
The workflow
Destinationfield is the main Delivery URL. -
The
Requestsarea contains the Delivery request and any additional requests. -
The requests run in the same order as the tabs are shown on screen.
-
The Delivery tab does not have to be last. You can place it before or after other requests.
-
Response values parsed from one request can be reused by later requests in the same sequence.
-
The whole sequence runs separately for each file.
-
Authentication settings are shared by the whole sequence. The same auth is used for all additional requests and for the Delivery request.
This means you can build flows such as:
-
Create record.
-
Read returned ID.
-
Upload file with that ID.
-
Confirm completion.
Settings Reference
User specific
Use the workflow User-specific option when the workflow should store private API data per user instead of only one shared configuration for the whole workflow.
For API Delivery, this can now be used for:
-
user-specific OAuth,
-
user-specific Basic authentication,
-
user-specific custom values such as tenant ID, customer code, branch code, or target mailbox ID.
If User-specific is turned off and the workflow is saved, all API parameters of type User-specific parameter are removed from the workflow configuration.
Revoke user-specific authorization on save
When editing an existing user-specific API workflow, a checkbox named Revoke user-specific authorization on save is shown near the Save button.
Use it when you want all currently saved private API authorizations for that workflow to be cleared after saving.
This is useful when you change:
-
authentication behavior,
-
parameter keys,
-
endpoint logic,
-
required user-specific values.
Important behavior
-
If you switch the workflow away from
API, existing user-specific API authorizations are always deleted. -
If you keep
APIbut turn offUser-specific, existing user-specific API authorizations are always deleted. -
If you keep
APIand keep theUser-specific, existing user-specific API authorizations are deleted only when this checkbox is checked.

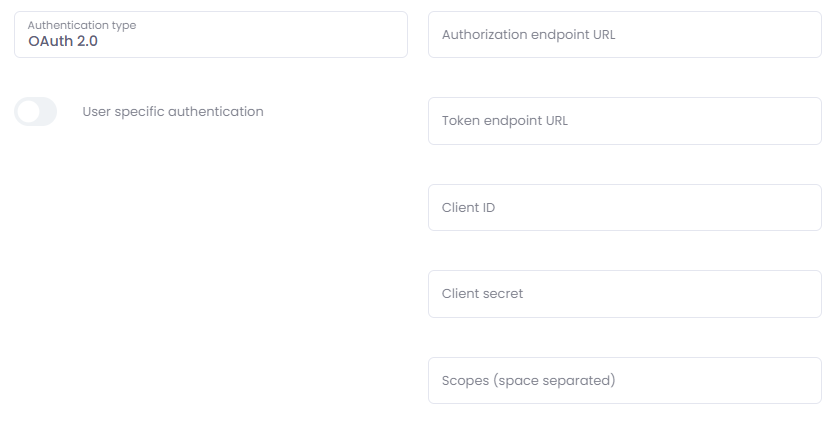
Authentication Settings
Authentication type
Available values:
-
None -
Basic HTML authentication -
OAuth 2.0
This authentication is applied to all requests in the sequence, not only to the Delivery request.
None
Use this when the target API does not require authentication, or when access is handled by a static header you add manually in Request parameters.
Typical example:
-
X-API-Keyin the request header as a static custom value.
Basic HTML authentication
This is standard HTTP Basic authentication.
When selected, the workflow shows:
-
Login -
Password
Use this when the API expects an Authorization: Basic ... in the header.

OAuth 2.0
When selected, the workflow shows:
-
Authorization endpoint URL -
Token endpoint URL -
Client ID -
Client secret -
Scopes (space separated)
Use this when the API requires OAuth authorization code flow and refresh tokens.
Important
-
The workflow must be saved before authorization can be completed.
-
Shared OAuth authorization is performed by an administrator from the workflow list using the key icon.
-
User-specific OAuth authorization is performed by the user from the
Private destinationswidget in Workplace.
User-specific authentication
This checkbox is visible only when all of these are true:
-
The workflow is
user-specific, -
Destination typeisAPI, -
Authentication typeisBasic HTML authenticationorOAuth 2.0.
Behavior:
-
If checked with
OAuth 2.0, each user authorizes the workflow from Workplace. -
If checked with
Basic HTML authentication, each user enters their private login and password in Workplace. -
If not checked, authentication remains shared on the workflow level.
Requests Area
The Requests area contains the complete request timeline for one delivered file.

The timeline contains:
-
One
Deliverytab, -
Zero or more additional
Requesttabs.
The order of the tabs is the execution order.
You can:
-
Add new requests with
Add request, -
Remove requests,
-
Drag request tabs to change execution order.
Default behavior:
-
Delivery usually starts as the last step,
-
But you can move it earlier if the target API requires upload before a follow-up API call.
Delivery Tab Settings
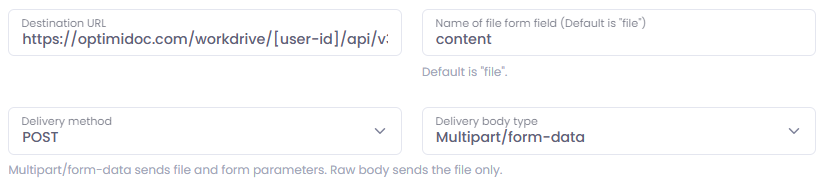
Destination URL
This is the standard workflow Destination field outside the request tabs.
In API mode it becomes the main upload URL used by the Delivery request.
You can use parameter placeholders in the URL if needed.
Name of file form field
This is the form field name used for the uploaded file in multipart mode.
Default:
-
file
Use it when the target API expects something else such as:
-
document -
content -
attachment -
uploadedFile
Allowed characters should be simple field-name characters such as letters, numbers, ., _, and -.
Delivery method
Available values:
-
POST -
PUT
Use:
-
POSTfor classic create/upload endpoints, -
PUTwhen the target API expects a file replacement or direct upload to a known URL.
Delivery body type
Available values:
-
Multipart/form-data -
Raw body
Multipart/form-data
Use this when the API expects:
-
the file plus extra fields,
-
the file plus metadata,
-
file upload as classic multipart form.
In this mode:
-
Form parameters are sent,
-
The file is sent under the configured file field name,
-
Metadata can also be sent as a form field.
Raw body
Use this when the API expects the file stream as the whole request body.
In this mode:
-
Only the file body is sent,
-
Request headers are still applied,
-
Form/body parameters are not sent,
-
Metadata is not sent with the delivery request.
This is the correct option for endpoints such as direct binary PUT uploads.
Request parameters
These are parameters for the Delivery request itself.
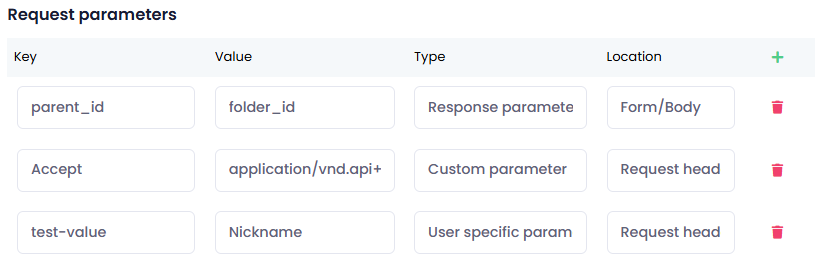
Each row has:
-
Key- Represents the key under which the parameter is used in the resulting request -
Value- Defines the source/value used in the generated request. The exact behavior depends on the parameter type. -
Type- Type of used request parameter (See detailed description below) -
Location- Determines where the parameter will be used in the resulting request
Parameter location
Location supports: Request header and Form/Body
Behavior:
-
header parameters become HTTP headers,
-
form/body parameters are included in multipart form mode,
-
in raw body mode, form/body parameters are ignored.
Parameter type
Type supports: System parameter, Custom parameter, Terminal parameter, Response parameter, and User-specific parameter
System parameter
Use this when the value should come from OptimiDoc system parameters (placeholder formatting).
This is the same placeholder mechanism used in other workflow areas such as output filenames and formatted text fields.
You typically enter:
-
a parameter name, or
-
a placeholder such as
[ParameterName].
Use this for values that already exist in the workflow context.
Extra system parameter:
In API delivery, the [file_size] parameter can be used to provide the size of the file being delivered (in bytes).
Custom parameter
Use this for a fixed literal value.
Examples:
-
fixed API key,
-
constant document type,
-
constant source system name.
A custom parameter is also stored under its Key, so it can be reused later as a placeholder in URLs, JSON templates, and other formatted fields.
Terminal parameter
Use this when the value should come from the MFP terminal as placeholder data available in OptimiDoc.
This is resolved through the same placeholder engine as system parameters.
You typically enter:
-
a terminal parameter key, or
-
a placeholder such as
[TerminalParameterKey].
Response parameter
Use this when you want to reference a value that was parsed earlier from a response (for details, see Response parameters section here).
Example:
-
In a response parameters table, create
jobIdwith selectordata.id. -
In a later request parameter row, set:
Type = Response parameterValue = jobId or [jobId]
The latter request will use the parsed value.
User-specific parameter
Use this when the value must be entered separately by each user.
This type is visible only when the workflow is User-specific (See more details here).
For this type:
-
Keyis the internal parameter key used in requests and placeholders. -
Valueis not the real parameter value. It is the label shown to the user in the Workplace pop-up.
Example:
-
Key = customerCode -
Value = Customer code
Then the user sees Customer code in the pop-up and enters the real value there.
Important
-
These values are saved privately per user,
-
They can be combined with shared auth, shared API settings, and user-specific auth
-
If the workflow is later saved as non-user-specific, these parameter rows are removed from the workflow.
Response parameters
These rows define how to parse values from the response. Values can be parsed from JSON or XML responses.
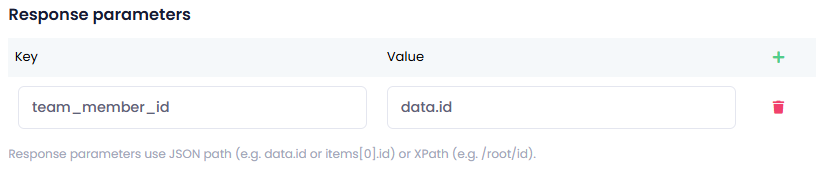
Each row has: Key and Value
Key is the variable name you want to create.
Value is the selector used to extract the returned value:
-
simple JSON path such as
data.idoritems[0].idfor array objects addressing, -
XPath (xml) such as
/root/id.
Parsed response values can be used by later requests in the same file sequence, both as a Response parameter (in request parameters table) or for a placeholder replacement [ResponseParameterKey] (directly in request URL or JSON template).
Additional Request Settings
Each extra Request tab represents one API call in the sequence.
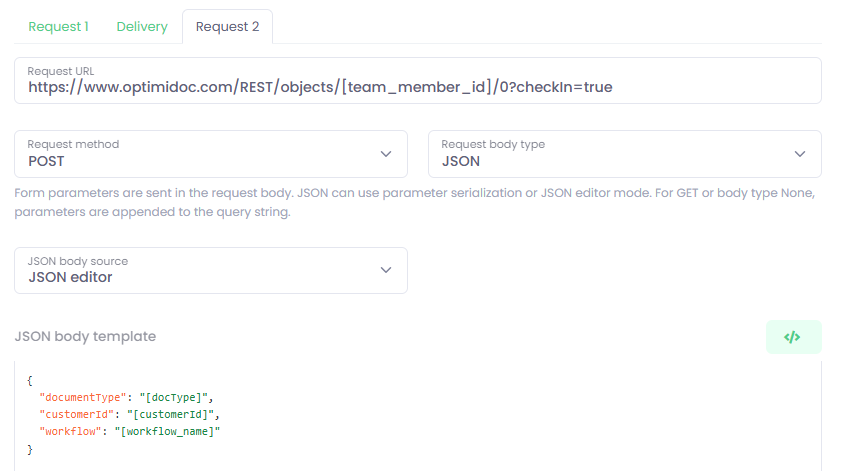
Request URL
This is the URL for that request. You can use placeholders in the URL.
Examples:
-
https://api.example.com/jobs -
https://api.example.com/jobs/[jobId]/complete -
[baseUrl]/v1/documents
Request method
Available values: POST, GET, PUT, PATCH
Request body type
Available values: Form, JSON, None
Behavior:
-
Formsends form parameters in the request body. -
JSONsends a JSON request body. -
Nonemeans no request body is sent. -
For
GETorNone, form/body parameters are appended to the query string.
JSON body source
Visible when Request body type is JSON.
Available values: From parameters and JSON editor
From parameters
The JSON body is generated from request parameters with the location value set to Form/Body.
Example of generated body from the set request parameters:
{
  "documentType": "[docType]",
  "customerId": "[customerId]",
  "workflow": "[workflow_name]"
}
This is useful for simple flat payloads.
JSON editor
You write the entire JSON request body manually in JSON body template.
Important behavior:
-
This template becomes the whole JSON body
-
Request parameters are ignored for body generation
-
Header parameters are still applied.
Use placeholders directly in the template.
Example:
{
  "PropertyValues": [
    {
      "PropertyDef": 0,
      "TypedValue": {
        "DataType": 1,
        "Value": "[documentname]",
        "UploadID": [UploadID]
      }
    }
  ]
}
If a placeholder should produce a string, keep it inside quotes. If it should produce a number or boolean, place it without quotes if the resolved value matches valid JSON.
Request parameters
This table works the same way as the Delivery request parameter table. (See here)
Response parameters
This table works the same way as the Delivery response parameter table. (See here)
Metadata Export Integration
API Delivery can also send workflow metadata, but only when Metadata export is enabled in the workflow.
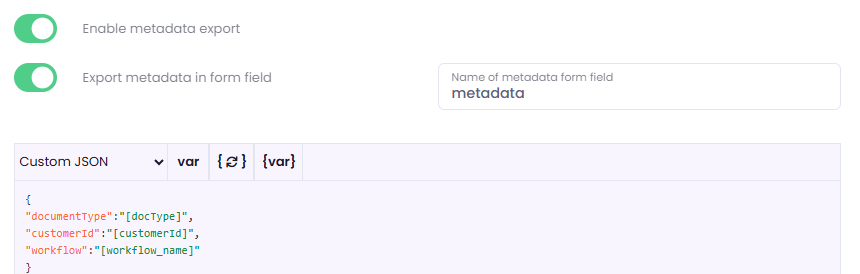
Workflow settings involved:
-
Enable metadata export -
Export metadata in a form field -
Name of metadata form field
Behavior:
-
If Metadata export is enabled and
Export metadata in form fieldis checked, metadata is sent as a text form field with the configured name -
If metadata export is enabled and that checkbox is not checked, metadata is attached in multipart mode as a separate file field named
metadata -
Metadata is sent only with
Multipart/form-data -
Metadata is not sent with
Raw body
This is useful when the target API expects either:
-
a separate JSON or XML metadata file, or
-
a single form field containing metadata text.
Shared vs User-Specific Authorization
Shared Authentication
Typical use-cases:
-
one company service account,
-
one shared OAuth application token,
-
one shared Basic account.
Use shared authentication when the whole workflow should use one common API identity.
Shared Basic authentication
Configuration:
-
Set
Authentication typetoBasic HTML authentication. -
Fill
LoginandPassword. -
Save the workflow.
Nothing else is needed. There is no separate authorization step.
Shared OAuth 2.0
Configuration:
-
Set
Authentication typetoOAuth 2.0. -
Fill in the OAuth endpoints, client ID, client secret, and scopes.
-
Save the workflow.
-
Return to the workflow list.
-
Click the key icon on the workflow row.
-
Complete the provider authorization screen.
After that, the workflow is authorized for shared use.

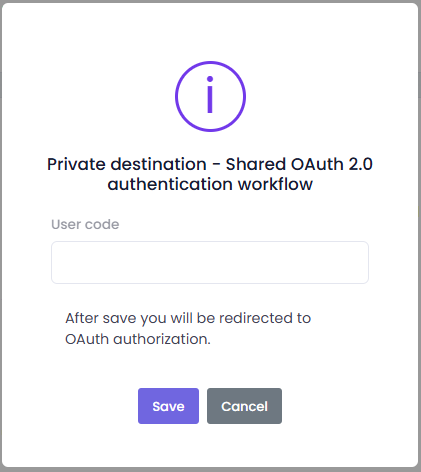
User-Specific Authorization and User-Specific Data
Use user-specific mode when each user must deliver files with their own private API data.
Examples:
-
each user has their own OAuth account,
-
each user has their own Basic credentials,
-
each user chooses a private destination code, such as department, mailbox, tenant, branch, or external user ID.
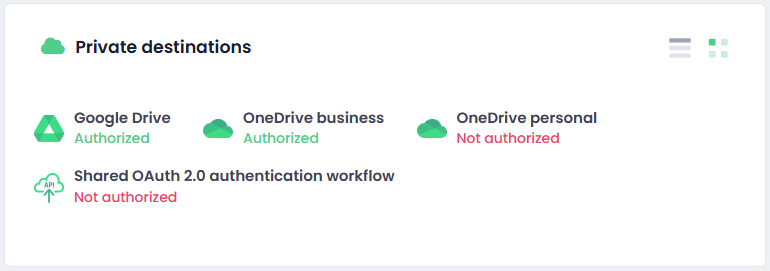
How users authorize in Workplace
Users go to:
-
Workplace -
Private destinations -
Click the API workflow item shown under the workflow name
The item is shown only when:
-
The workflow is user-specific
-
The workflow is API destination
-
The user has rights to use the workflow
-
The workflow requires private user configuration such as user-specific auth or user-specific parameters.
The status shows:
-
Authorized -
Not authorized
Users can also revoke the saved private configuration from the same widget.
What happens when the user clicks the item
If the workflow has user-specific parameters
A pop-up is shown with one input row per user-specific parameter.
The label of each row is taken from the parameter Value, which acts as the display label.
All fields are required.
If the workflow has user-specific Basic authentication
The same pop-up also includes:
-
Login -
Password
All fields are required.
If the workflow has user-specific OAuth
There are two possible behaviors:
-
If the workflow also has user-specific parameters, the pop-up with parameters is shown first, and then the user is redirected to OAuth,
-
If the workflow only needs OAuth and no parameter pop-up input is required, the user is redirected directly.
-
Important:
-
The private API configuration is saved only after all required steps are completed
-
This prevents the destination from looking authorized while the required data is still missing
Recommended Setup Patterns
Use Case 1: Simple file upload without authentication
Use this when the endpoint only needs a file upload.
Setup:
-
Authentication type = None -
Delivery method = POST -
Delivery body type = Multipart/form-data -
Set the file field name if the API expects a name other than
file
Good for:
-
simple inbound upload endpoints,
-
test endpoints,
-
internal services behind network trust.
Use Case 2: Upload with a static API key header
Use this when the endpoint expects a custom header such as X-API-Key.
Setup:
-
Authentication type = None -
In Delivery
Request parameters, add:Key = X-API-KeyValue = your-real-api-keyType = Custom parameterLocation = Request header
Good for:
-
APIs that do not use OAuth or Basic auth,
-
API gateway style integrations.
Use Case 3: Shared Basic authentication
Use this when one shared account is enough for the whole workflow.
Setup:
-
Authentication type = Basic html authentication -
Fill
LoginandPassword -
Save the workflow
Good for:
-
one shared service account,
-
simple internal REST endpoints.
Use Case 4: Shared OAuth 2.0
Use this when one shared OAuth authorization should be used for all workflow users.
Setup:
-
Authentication type = OAuth 2.0 -
Fill OAuth settings
-
Save workflow
-
Authorize it from the workflow list using the key icon
Good for:
-
one central integration account,
-
one tenant-wide service authorization.
Use Case 5: User-specific OAuth 2.0
Use this when each user must deliver with their own OAuth account.
Setup:
-
Turn on workflow
User specific -
Set
Authentication type = OAuth 2.0 -
Check
User specific authentication -
Save the workflow
-
Each user authorizes the workflow in Workplace
Good for:
-
each user sends to their own external account,
-
delivery must be audited under the user identity,
-
the API requires user consent per person.
Use Case 6: User-specific Basic authentication
Use this when each user has their own Basic credentials.
Setup:
-
Turn on workflow
User specific -
Set
Authentication type = Basic html authentication -
Check
User specific authentication -
Save the workflow
-
Each user enters their own login and password in Workplace
Good for:
-
legacy APIs with per-user service credentials,
-
systems that do not support OAuth but must keep user accounts separate.
Use Case 7: Shared authentication plus user-specific business value
Use this when all users share the same technical auth, but each user must send a different business value.
Example:
-
shared OAuth token,
-
each user must send their own
customerCode.
Setup:
-
Turn on workflow
User specific -
Keep authentication shared, or use shared OAuth/Basic
-
Add a Delivery or Request parameter:
Key = customerCodeValue = Customer codeType = User specific parameterLocation = Form/BodyorRequest header -
Save the workflow
-
Each user fills
Customer codein Workplace
Good for:
-
shared integration account with per-user routing,
-
branch-based or department-based external routing.
Use Case 8: Create a record first, then upload the file
Use this when the target API requires a record ID before the upload call.
Example flow:
-
Request 1creates the external record. -
Request 1response parameter parsesjobIdfromdata.id. -
Delivery uses
jobIdin the URL, headers, or form/body.
Example:
Request 1
-
URL:
https://api.example.com/jobs -
Method:
POST -
Body type:
JSON -
JSON template:
{
  "workflow": "[workflow_name]",
  "user": "[username]"
}
Request 1 response parameters
-
Key = jobId -
Value = data.id
Delivery
-
Destination URL:
https://api.example.com/jobs/[jobId]/documents
Good for:
-
ticket-based APIs,
-
DMS platforms that require a document container first.
Use Case 9: Upload file first, then confirm or finalize
Use this when the upload response must be parsed and used in a later request.
Example flow:
-
Move
DeliverybeforeRequest 2 -
Parse
uploadIdfrom the Delivery response -
Use
uploadIdinRequest 2
Example:
Delivery response parameters
-
Key = uploadId -
Value = data.uploadId
Request 2
-
URL:
https://api.example.com/uploads/[uploadId]/complete -
Method:
PATCH
Good for:
-
APIs with asynchronous upload finalization,
-
systems that need explicit completion after file transfer.
Use Case 10: Raw binary upload
Use this when the endpoint expects the file as the whole request body.
Setup:
-
Delivery method = PUTorPOST -
Delivery body type = Raw body -
Put any required auth or custom headers in Delivery request parameters
Important:
-
do not rely on form/body parameters here,
-
do not rely on metadata attachment here,
-
if the target system also needs metadata, send it through an additional request.
Best Practices
-
Start with the smallest possible working request sequence.
-
Use
Multipart/form-dataunless the API clearly expects the raw file body. -
Use additional requests only when the target API really requires them.
-
Use response parameter keys with simple names such as
jobId,uploadId,folderId. -
Keep header names simple and standard.
-
Use
Custom parameterfor fixed literal values. -
Use
System parameter,Terminal parameter, orResponse parameteronly when you really need placeholder resolution. -
Use
User specific parameterwhen the real value must come from the user. -
If you change the user-specific contract of a live workflow, use
Revoke user-specific authorization on save. -
If the target system expects JSON, prefer
JSON editorwhen the body structure is nested or complex.
Troubleshooting
The file is uploaded, but additional fields are missing
Check:
-
Delivery body typeis notRaw body -
The fields are placed in
Form/Body -
The endpoint really expects multipart fields
The request body is JSON, but my request parameters are ignored
If JSON body source = JSON editor, the JSON template becomes the whole body.
Only header parameters are used in request.
My later request does not see a parsed value
Check:
-
The earlier request really runs first
-
The response selector is correct
-
The response is JSON or XML in the format you expect
-
The later request uses
Type = Response parameter
User-specific API workflow is shown as Not authorized
Check whether the workflow requires one or more of these:
-
user-specific OAuth,
-
user-specific Basic credentials,
-
user-specific parameters.
The workflow is considered authorized only when all required private values for that user are saved.
OAuth is configured, but delivery still fails
Check:
-
The workflow was actually authorized after saving
-
The token endpoint and authorization endpoint are correct
-
The scopes are correct
-
The provider supports authorization code flow and refresh token exchange for this client
Request URL validation fails
Check:
-
The URL contains no whitespace
-
The URL contains a scheme such as
https:// -
The full URL is created from placeholders