The Microsoft Entra ID import source provides full integration between OptimiDoc Cloud and the organisation’s Microsoft 365 identity directory.
The integration uses Microsoft Graph API and the OAuth 2.0 protocol to securely retrieve user information.
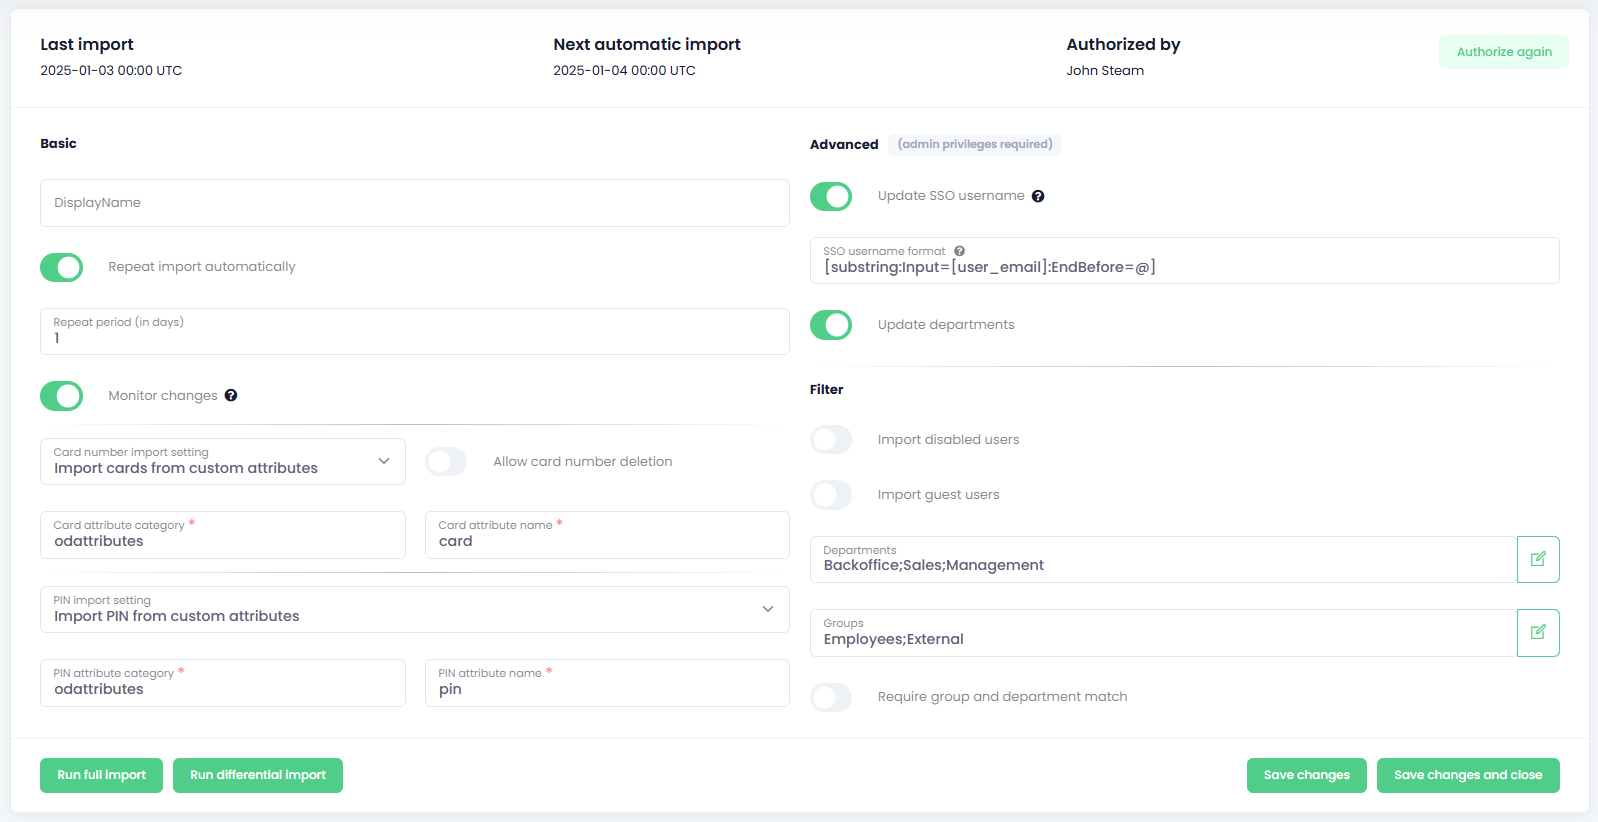
At the top of the Entra ID import page, OptimiDoc Cloud displays:
-
Last synchronisation time
-
Next planned synchronisation time
-
User who authorised the import
This allows administrators to quickly verify the operational state of the integration.
How to setup the EntraID configuration
The Entra ID import configuration consists of two areas:
-
Basic Configuration
-
Advanced Configuration
Basic Configuration
The Basic configuration defines how the import operates, how often synchronisation is performed, and how specific attributes (cards, PINs) are handled.
-
Display Name
-
A custom name for the import source.
-
This name appears in the Import Sources list.
-
-
Send E‑mail Notifications
-
When a new user is created through any import source, OptimiDoc Cloud automatically sends a welcome e‑mail to the user.
-
This notification includes essential information for accessing the system, such as login details and initial instructions (if enabled in tenant settings).
-
The content of the welcome email can be customised in the Custom email section of the OptimiDoc Cloud Admin Portal.
-
-
Automatic Import Settings
-
Repeat import automatically
Enable to run the import on a scheduled basis. -
Repeat period (in days)
Defines the number of days between synchronisation cycles. -
Monitor changes
Enables near real‑time synchronisation using WebHooks.
(Microsoft documentation: https://learn.microsoft.com/en-us/graph/webhooks)
-
-
Card Number Import Settings
Determine how card numbers are imported from Entra ID:-
Don’t modify card numbers
Card numbers in OptimiDoc Cloud remain unchanged. -
Import cards from standard attributes
Uses standard Entra ID attributes to import card numbers. -
Import cards from custom attributes
Uses custom‑defined attributes created in Entra ID. -
Allow card number deletion
-
Disabled → Only new cards are added, existing ones remain untouched.
-
Enabled → All existing card numbers are replaced with those from Entra ID.
-
-
Card attribute category
Category name used when importing from custom attributes. -
Card attribute name
Specific attribute name (standard or custom) used for import.
-
-
PIN Import Settings
Control how PINs are imported or generated:-
Don’t modify PIN
Existing PINs remain unchanged. -
Generate PIN when empty
Generates a PIN for every user who does not have one.
Existing non‑generated PINs are preserved. -
PIN length
Number of digits in the automatically generated PIN. -
Generate PIN for new users
When enabled, new users receive an automatically generated PIN. -
Import PIN from standard attributes
Uses standard Entra ID attributes for PIN import. -
Import PIN from custom attributes
Uses user‑created Entra ID attributes.
-
-
PIN attribute category
Category name of the custom PIN attribute. -
PIN attribute name
Specific attribute name for PIN import.
IMPORTANT
-
To create and edit attributes, the Attribute Definition Administrator role is required.
-
To edit user attributes, the Attribute Assignment Administrator role is required.
Custom attributes are created in Microsoft Entra Admin Center under:
Protection → Custom security attributes
https://entra.microsoft.com/#view/Microsoft_AAD_IAM/CustomAttributesCatalogAttributeSetsBlade
-
Card attribute can contain multiple values.
-
PIN attribute must contain a single value. If more values exist, only the first is imported.
Advanced Configuration
The Advanced configuration controls SSO username formatting, department updates, and filtering behaviour.
Advanced configuration options require that the authorising user has administrator‑level privileges in Entra ID.
IMPORTANT
Advanced configuration options require that the user authorising the import has administrative permissions in Entra ID.
Permissions required:
-
User.ReadBasic.All – Import without department and SSO fields.
-
User.Read.All – Required to import department fields.
To authorise the application:
-
The user must have the Cloud Application Administrator role
(manages application registrations and service principals).
However, granting consent for required permissions often exceeds this role’s capabilities.
Therefore, the following role is needed:
-
Privileged Role Administrator
This role can grant tenant‑wide admin consent for applications requesting permissions to any API.
-
Update SSO Username
When enabled, the user’s SSO name is updated during every import.
SSO Username Format
If left empty → The user’s e‑mail is used.
Available placeholders:
[user_sam_account_name]
[user_principal_name]
[user_email_nickname]
[user_mail_nickname]
[user_full_name], [user_name]
[user_given_name], [user_first_name]
[user_family_name], [user_last_name], [user_surname]
[user_mail], [user_email]
EXAMPLES
To create SSO name in format “Snow John”:
[user_last_name] [user_first_name]
To create SSO name in format “domain\jsnow”:
domain\[user_sam_account_name]
-
Update Departments
When enabled, the user’s department is synchronised during every import. -
Filtering Settings
These filters control which users are included in the import:
-
Import disabled users
If enabled, disabled Entra ID users are imported as well. -
Import guest users
If enabled, guest users are synchronised. -
Departments
Only users from the specified departments are imported. -
Groups
Only users from the selected groups are imported. -
Require group and department match
-
Disabled → User must match either group OR department.
-
Enabled → User must match both criteria.
-
Saving Import Settings
After modifying any import settings, click the Save button to store the configuration.
The updated settings will be applied during the next scheduled synchronisation, or immediately if a manual import is triggered.
Synchronisation Types
OptimiDoc Cloud provides two synchronisation modes for Microsoft Entra ID integrations.
1. Full Synchronisation
A full synchronisation retrieves and processes all users and all supported attributes from Entra ID.
-
Use this method when configuring the import source for the first time.
-
It is also required after structural changes, such as attribute mapping adjustments or priority changes.
To perform a full synchronisation, click Run full import.
2. Differential Synchronisation
A differential synchronisation processes only changes since the last successful full synchronisation.
This significantly reduces workload, bandwidth, and API consumption.
-
Differential synchronisation begins only after a full synchronisation has been completed.
To perform a differential synchronisation manually, click Run differential import.
Differential synchronisation is available only after a successful full synchronisation.
During the first synchronisation, the administrator is required to authorise access to Microsoft Entra ID.
Reauthorising the Import Source
To refresh or renew the permissions:
-
Click Authorize again.
This is required when authorization tokens expire or when administrative permissions are changed.
The Microsoft Entra ID import source provides full integration with the organisation’s Microsoft 365 identity directory. It consists of two configuration areas: Basic and Advanced settings.